学习 nestJs
跟着大神『小满 zs』学习 nestJs,膜拜大佬 🙇
- 大神 csdn:https://xiaoman.blog.csdn.net/?type=blog
- 专题链接:https://blog.csdn.net/qq1195566313/category_11844396.html
- 专题视频链接:https://www.bilibili.com/video/BV1NG41187Bs?p=1&vd_source=bdde7ba95ce71c2d62a2e5a531850cb6
相关插件包:
- multer
用于处理上传文件
pnpm i multer -S
pnpm i @types/multer -D- cors
用于处理跨域
pnpm i cors -S
pnpm i @types/cors -D- uuid
用于生成 uuid、验证 uuid 格式、路由程序中处理 uuid 参数
pnpm i uuid -S
pnpm i @types/uuid -D- 验证器
pnpm i class-validator class-transformer -S第一章:序言
Nestjs 用于构建高效且可伸缩的服务端应用程序的渐进式 Node.js 框架
英文官网:https://nestjs.com/
半英文官网: https://nestjs.bootcss.com/
其它版本中文网:http://nestjs.inode.club/
特点:
- 完美支持 Typescript
- 面向 AOP 编程
- 支持 Typeorm
- 高并发,异步非阻塞 IO
- Node.js 版的 spring
- 构建微服务应用
- 内置 Express 且默认 Express
语言特点:
- spring MVC 风格
- 依赖注入、IOS、控制反转等都借鉴了 Angular 语法
TypeORM
TypeORM 是一个用于 Node.js、浏览器、React Native 和 Electron 等 JavaScript 平台的 ORM(对象关系映射)框架。ORM 是一种编程技术,用于在对象(通常是面向对象编程语言中的类或对象)和关系型数据库之间建立映射,从而实现通过面向对象的方式操作数据库。
TypeORM 提供了一种在 TypeScript 或 JavaScript 中定义实体(Entity)、管理实体之间的关系以及执行数据库操作的方式。它支持多种数据库系统,包括 MySQL、PostgreSQL、SQLite、Microsoft SQL Server 等。
TypeORM 的主要功能和特点包括:
- 实体(Entity):通过定义实体类来表示数据库中的表,实体类中的属性对应表中的列。
- 数据库迁移:支持数据库迁移,可以方便地更新数据库结构。
- 关系管理:支持定义实体之间的关系,包括一对一、一对多、多对一和多对多等关系。
- 查询构建器:提供了强大的查询构建器,支持复杂的查询操作。
- 支持 TypeScript:完全支持 TypeScript,可以在 TypeScript 中使用装饰器来定义实体和关系。
- 使用 TypeORM 可以简化数据库操作的开发过程,提高开发效率,并且能够使代码更加清晰和易于维护。
第二章:Nestjs 相关概念介绍
- IOC
Inversion Of Control: 控制反转。定义是 高层模块不应该依赖低层模块,二者都应该依赖其抽象;抽象不应该依赖细节;细节应该依赖抽象。
- DI
Dependency Injection: 依赖注入。 其实和 IOC 是同根生,这两个本来就是同一个东西,只不过控制反转概念比较含糊(可能只是理解为容器对象这一个层面,很难让人想到谁来维护对象关系),所以 2004 年大师级人物 Martin Flower 又给出一个新的名字:依赖注入;即类 A 依赖类 B 的常规表现是在 A 中使用 B 的 instance
class A {
  name: string;
  constructor(name: string) {
    this.name = name;
  }
}

class B {
  age: number;
  entity: A;
  constuctor(age: number) {
    this.age = age;
    this.entity = new A("小满");
  }
}

const c = new B(18);
console.log(c.entity.name); // 小满从上面的代码可以看出 B 类中代码的实现是需要依赖 A 的,两者的代码耦合度非常高。当两者的业务逻辑复杂程度增加的情况下,维护成本与代码可读性都会随着增加,并且很难再多引入额外的模块进行功能扩展,为了解决这个问题可以使用 ICO 容器。
class A {
  name: string;
  constructor(name: string) {
    this.name = name;
  }
}

class C {
  name: string;
  constructor(name: string) {
    this.name = name;
  }
}

class Container {
  modeuls: any;
  constructor() {
    this.modeuls = {};
  }
  provide(key: string, modeuls: any) {
    this.modeuls[key] = modeuls;
  }
  get(key) {
    return modeuls[key];
  }
}

const mo = new Container();
md.provide("a", new A("小满"));
md.provide("c", new C("小城"));

class B {
  a: any;
  c: any;
  contructor(container: Container) {
    this.a = container.get("a");
    this.c = container.get("c");
  }
}

new B(mo);其实就是写了一个中间件,来收集依赖,主要为了解耦,减少维护成本。
第三章:装饰器-概念介绍
装饰器: 装饰器是一种特殊的类型声明,他可以附加在类,方法,属性,参数上。
💡tip:在 TS 中使用需要开启 experimentalDectorators:true 。
语法:通过 @ 符号添加装饰器 装饰器分类:
- 类装饰器
- 属性装饰器
- 属性装饰器
- 参数装饰器
- 方法装饰器
类装饰器
它会自动把 class 的构造器传入到装饰器的第一个参数 target,然后通过 prototype 可以自定义添加属性和方法
function decotators(target: any) {
  target.prototype.name = "小满";
}

@decotators
class Xiaoman {
  constructor() {}
}

const xiaoman: any = new Xiaoman();
console.log(xiaoman.name); // '小满'属性装饰器
它会返回两个参数: 原型对象 、 属性的名称
const currency: PropertyDecorator = (target: any, key: string) {
    console.log(target, key)
}

class Xiaoman {
    @currency
    public name: string
    constructor() {
        this.name = ''
    }
    getName() {
        return this.name
    }
}参数装饰器
它会返回三个参数: 原型对象、 方法的名称、 参数的位置索引,从0开始
const currency: ParameteDecorator = (target: any, key: string | symbol, index: number) {
    console.log(target, key, index)
}

class Xiaoman {
    public name: string
    constructor() {
        this.name = ''
    }
    getName(name: string, @currency age: number) {
        return this.name
    }
}方法装饰器
它会返回三个参数, 原型对象、 方法的名称、 属性描述符:可写对应writable、可枚举对应enumerable、可配置对应configurable
const currency: MethodDecorator = (
  target: any,
  key: string | symbol,
  descriptor: any
) => {
  console.log(target, key, descriptor);
};

class Xiaoman {
  public name: string;
  constructor() {
    this.name = "";
  }
  @currency
  getName(name: string, age: number) {
    return this.name;
  }
}第四章:装饰器-实现一个 get 请求
安装请求依赖
npm install axios -S定义控制器 Controller:
class Controller {
  constructor() {}
  getList() {}
}定义装饰器,这时候需要使用装饰器工厂,为装饰器塞入一些参数,定义 descriptor 描述符里面的 value 把 axios 的结果返回给当前使用装饰器的函数
const Get = (url: string): MethodDecorator => {
  return (target, key, descriptor: PropertyDescriptor) => {
    const fnc = descriptor.value;
    axios
      .get(url)
      .then((res) => {
        fnc(res, {
          status: 200,
        });
      })
      .catch((err) => {
        fnc(res, {
          status: 500,
        });
      });
  };
};完成代码如下,接口允许跨域
import axios from "axios";

// 实现get装饰器
const Get = (url: string): MethodDecorator => {
  return (target, key, descriptor: PropertyDescriptor) => {
    const fnc = descriptor.value;
    axios
      .get(url)
      .then((res) => {
        fnc(res, {
          status: 200,
        });
      })
      .catch((err) => {
        fnc(res, {
          status: 500,
        });
      });
  };
};

定义控制器;
class Controller {
  constructor() {}
  @Get("https://api.apiopen.top/api/getHaoKanVidao?page=0&size=10")
  getList(res: any, status: any) {
    console.log(res, status);
  }
}第五章 正题:nestjs-cli
安装&创建项目
安装 nestjs 的 脚手架cli , 通过 cli 创建 nestjs 项目
npm i -g @nestjs/cli

nest new [项目名称]启动项目,需要热更新,启动 npm run start:dev 即可
目录介绍&文件介绍
├── first-nest
│   ├── README.md
│   ├── nest-cli.json
│   ├── node_modules
│   ├── package.json
│   ├── pnpm-lock.yaml
│   ├── src
│   │   ├── app.controller.spec.ts      // 针对控制器的单元测试
│   │   ├── app.controller.ts           // 路由入口文件
│   │   ├── app.module.ts               // 应用程序的根模块
│   │   ├── app.service.ts              // 业务逻辑实现模块:Controller也可以实现,但是这样就成了单一的,无法复用了。
│   │   └── main.ts                     // 入口文件,类似于vue的 main.ts
│   ├── test
│   │   ├── app.e2e-spec.ts
│   │   └── jest-e2e.json
│   ├── tsconfig.build.json
│ └── tsconfig.json- main.ts 代码解析:
import { NestFactory } from "@nestjs/core";
import { AppModule } from "./app.module";

async function bootstrap() {
  // 通过 NestFactor.create(AppModule) 创建一个app
  const app = await NestFactory.create(AppModule);
  // 服务启动端口
  await app.listen(3000);
}
bootstrap();- Controller.ts 控制器
import { Controller, Get } from "@nestjs/common";
import { AppService } from "./app.service";

@Controller()
export class AppController {
  // private readonly appService: AppService 依赖注入,不需要实例化,appService内部会自己实例化,只需挂载即可
  constructor(private readonly appService: AppService) {}

  @Get()
  getHello(): string {
    return this.appService.getHello();
  }
}第六章 nestjs-cli 常用命令
使用 nest --help 可以查看 nestjs 所有命令
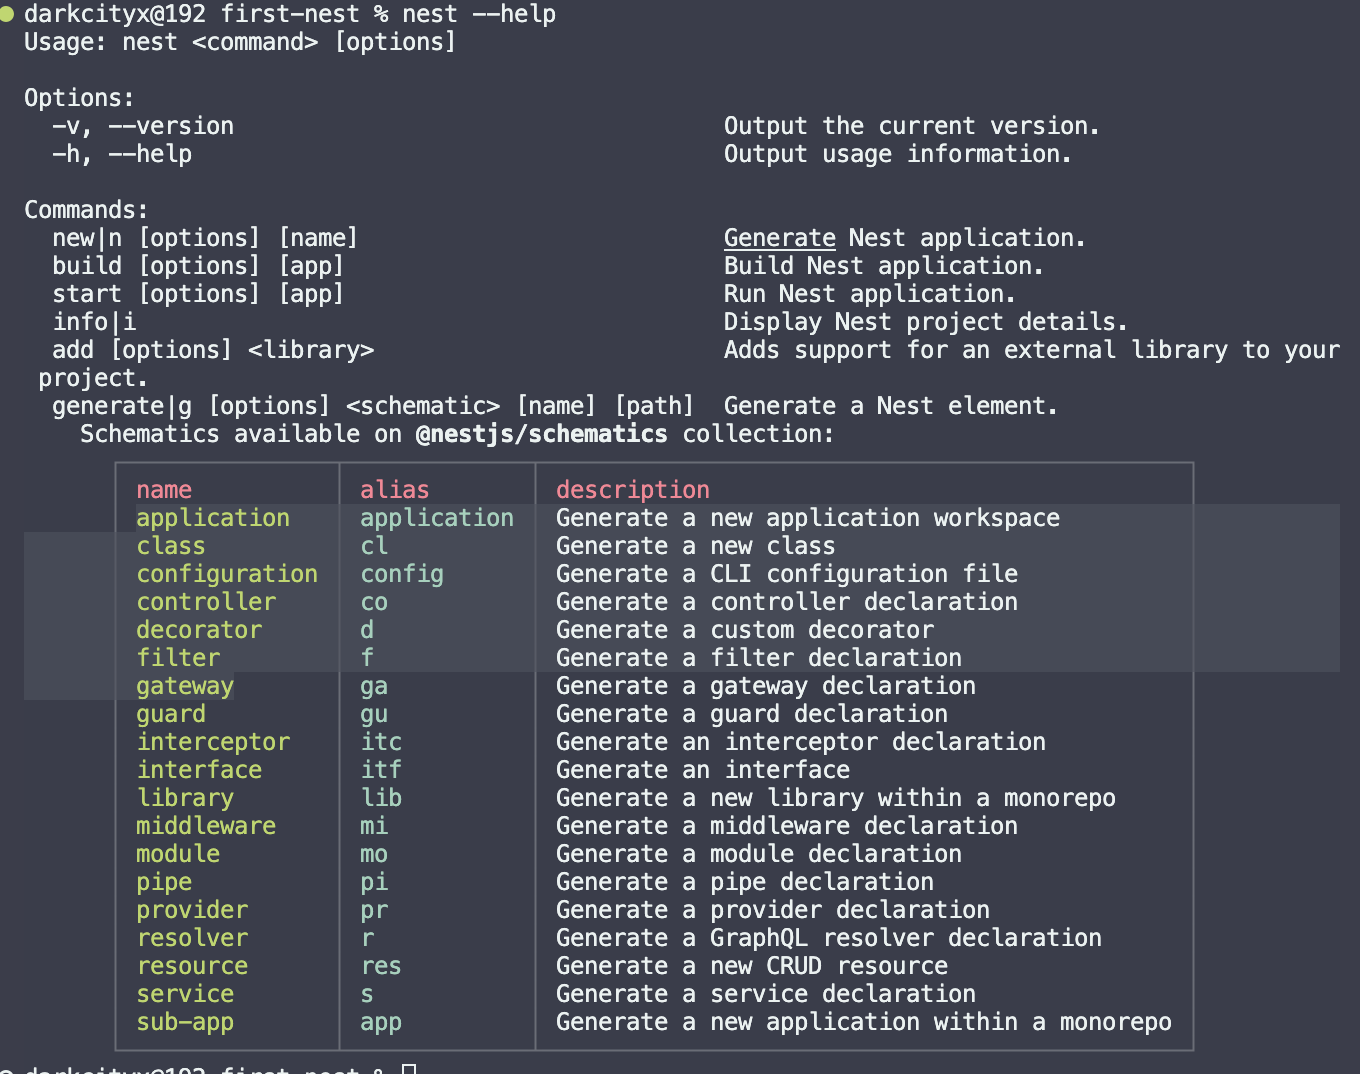
- 生成 controller.ts
nest g co [name] - 生成 module.ts
nest g mo [name] - 生成 service.ts
nest g s [name] - 生成 CURD
nest g res [name]
第一次使用 nest g res [name] 这个命令,除了生成文件还会自动使用 npm 帮我们更新资源,安装一些额外的插件,后续在次使用就不会更新了
第七章 传统风格 & RESTful & 接口版本控制
| 操作\style type | 传统接口 | REFSTful API |
|---|---|---|
| 增 | http://localhost:8080/api/add_list?id=1 | http://localhost:8080/api/get_list/1 |
| 删 | http://localhost:8080/api/delete_list?id=1 | |
| 改 | http://localhost:8080/api/update_list?id=1 | |
| 查 | http://localhost:8080/api/get_list?id=1 |
传统接口
import {
  Body,
  Controller,
  Delete,
  Get,
  Param,
  Patch,
  Post,
  Query,
} from "@nestjs/common";

@Controller("example")
export class ExampleController {
  /* ---------------- 传统 ---------------- */
  // 增 /example/add
  @Post("add")
  exampleAdd(@Body() body: any) {
    return `tradition add ${body}`;
  }
  // 删 /example/delete
  @Get("delete")
  examplateDelete(@Query() req: any) {
    console.log("req::", req);
    return `tradition delete`;
  }
  // 改 /example/update
  @Post("update")
  examplateUpdate(@Body() body: any) {
    console.log("body::", body);
    return `tradition update ${body}`;
  }
  // 查 /example/findById
  @Get("findById")
  examplateFindById(@Query("id") id: string) {
    return `tradition find #${id}`;
  }
}RESTful
RESTful API 全称是 Representational State Transfer,即表述性状态转移。它是一种互联网软件架构风格,旨在通过互联网从客户端到服务器的传递信息,实现不同系统之间的信息交换。
RESTful API 风格一个接口就会完成 增删改查,他是通过不同的请求方式来区分查询、提交、更新、删除等操作的。

API 版本控制
mian.ts 配置版本控制
- URL Versioning: 版本将在请求的 url 中传递(默认)
- Header Vsersioning: 自定义请求标头将制定版本
- Media Versioning: 请求的 Accept 标头将制定版本
import { NestFactory } from "@nestjs/core";
/**
 * RESTful 版本控制
 *  - URL Versioning 版本将在请求的url中传递(默认)
 *  - Header Versioning 自定义请求表头将制定版本
 *  - Media Type Vsersioning 请求的Accept标头将制定版本
 *
 */
import { VersioningType } from "@nestjs/common";
import { AppModule } from "./app.module";

async function bootstrap() {
  const app = await NestFactory.create(AppModule);
  // 版本控制
  app.enableVersioning({
    type: VersioningType.URI,
  });
  await app.listen(3000);
}
bootstrap();在 Controlle 版本控制
// 在这里控制版本
@Controller({
  path: "user",
  version: "1",
})
export class UserController {
  constructor(private readonly userService: UserService) {}

  @Post()
  create(@Body() createUserDto: CreateUserDto) {
    return this.userService.create(createUserDto);
  }

  @Get()
  // findAll(@Request() req) {
  findAll(@Query() query) {
    // console.log('req:', req.query)
    console.log("query:", query);
    return this.userService.findAll();
  }

  @Get(":id")
  findOne(@Param("id") id: string) {
    return this.userService.findOne(+id);
  }

  @Patch(":id")
  update(@Param("id") id: string, @Body() updateUserDto: UpdateUserDto) {
    return this.userService.update(+id, updateUserDto);
  }

  @Delete(":id")
  remove(@Param("id") id: string) {
    return this.userService.remove(+id);
  }
}第八章 nestjs 控制器
- Controller Request 获取前端传递过来的参数
nestjs 提供了方法、参数装饰器,用来帮助我们快速获取参数
| 装饰器 | 获取内容 |
|---|---|
@Request() | req |
@Response() | res |
@Next() | nest |
@Session() | req.session |
@Param(key?: string) | req.params/req.params[key] |
@Body(key?: string) | req.body/req.body[key] |
@Query(key?: string) | req.query/req.query[key] |
@Headers(name?: string) | req.headers/req.header[name] |
@HttpCode |
可以使用 postman、ApiFox 等,进行接口测试
@Request
获取请求参数相关数据,包括 query、body
// @Request get
@Get()
find(@Request() req) {
  console.log(req.query)
}

// @Request post
@Post()
find(@Request() req) {
  console.log(req.body)
}@Query
获取 get 请求入参
// @Query or Query(key?)
@Get()
find(@Query() query) {
  console.log(query)
}

@Get()
find(
  @Query('id') id: string,
  @Query('name' name: string)
) {
  console.log('id')
}@Body
// @Body or Body(key?)
@Post()
create(@Body() body) {
  console.log(body)
}

@Post()
create(
  @Body('name') name: string
) {
  console.log(body)
}@Param 动态路由参数
// @Param or Param(name?)
@Get()
find(@Param() params) {
  console.log(params)
}

@Get(':id/:name')
find(
  @Param('id') id: string,
  @Param('name') name: string
) {
  console.log(id, name)
}@Header
// @Headers or Headers(name?)
@Get()
find(@Headers() headers) {
  console.log(headers)
}


@Get()
find(@Headers('cookie') cookie: string) {
  console.log(cookie)
}@HttpCode
使用 @HttpCode 装饰器控制接口返回的状态码
@Get()
@HttpCode(500)
find() {
  return {
    code: 500
  }
}第九章 nestjs-@session
session 通常用于跟踪用户在网站上的活动,并在用户浏览网站时保持持久性状态。会话可以用于存储用户的登录状态、购物车内容、首选项等信息。
nestjs 默认集成 express,所以 express 的插件也支持,所以可以直接安装 express-session 插件
// session 插件
pnpm i express-session --save

// ts提示支持
pnpm i @types/express-session -Dmain.ts 中通过 app.use() 注册 express-session 插件
import * as session from 'express-session';

...
app.use(session())
...参数配置
| 参数 | 说明 |
|---|---|
| secret | 生成服务端 session 签名,可以理解为加盐 |
| name | 生成客户端 cookie 的名字,默认 connect.sid |
| cookie | 设置返回到前端 key 的属性,默认值为 { path: '/', httpOnly: true, secure: false, maxAge: null } |
| rolling | 在每次请求时强行设置 cookie, 这将重置 cookie 过期时间(默认 false) |
案例-验证码
pnpm i svg-captcha -S@Get('code')
createCaptcha(@Request() req, @Response() res) {
const captcha = svgCaptcha.create({
size: 4,
fontSize: 50,
width: 100,
height: 40,
background: '#fc5531',
})
console.log('captcha:', captcha)
console.log(req)
req.session.code = captcha.text
res.type('svg')
res.send(captcha.data)
}
@Get('validCode')
validCode(@Request() req, @Response() res) {
const beCode = req.query.code
const sessionCode = req.session.code
console.log('beCode::', beCode)
console.log('sessionCode::', sessionCode)
if (beCode.toLowerCase() === sessionCode.toLowerCase()) {
res.send({
code: 1,
messsage: '验证码正确'
})
} else {
res.send({
code: 0,
messsage: '验证码错误'
})
}
}第十章 nestjs 提供者
Providers 是 nest 的一个基本概念。许多基本的 nest 类可以被视为 provider,如 service、repository、factory、helper 等等。他们都可以通过 constructor 注入依赖。这意味着对象可以彼此创建各种关系,并且连接对象实例的功能在很大程度上可以委托给 Nest 运行时系统。Provider 只是一个用 @Injectable() 装饰器注释的类。
一、基本用法
modle 引入 service,在 providers 中注入
user/user.module.ts
import { Module } from "@nestjs/common";
// 引入 UserService
import { UserService } from "./user.service";
import { UserController } from "./user.controller";

@Module({
  controllers: [UserController],
  // 依赖注入
  providers: [UserService],
})
export class UserModule {}user/user.controller.ts
import { Controller, Get, Query } from "@nestjs/common";
import { UserService } from "./user.service";

@Controller({
  path: "user",
  // version: '1'
})
export class UserController {
  // 实例化 userService
  constructor(private readonly userService: UserService) {}

  @Get("findOneByName")
  findOneByName(@Query() req: { name?: string }) {
    console.log("params::", req);
    return `我的姓名是:${req.name}`;
  }
}二、自定义名称
第一种语法其实就是一个语法糖,其本质语法如下:
user/user.module.ts
import { Module } from "@nestjs/common";
// 引入 UserService
import { UserService } from "./user.service";
import { UserController } from "./user.controller";

@Module({
  controllers: [UserController],
  // 依赖注入
  providers: [
    {
      // 自定义名称
      provide: "customnService",
      useClass: UserService,
    },
  ],
})
export class UserModule {}自定义名称后,需要用对应的 Inject 取值,否则会找不到
user/user.controller.ts
import { Controller, Get, Query } from "@nestjs/common";
import { UserService } from "./user.service";

@Controller({
  path: "user",
  // version: '1'
})
export class UserController {
  // 实例化 userService   @Inject 获取provider的service
  constructor(
    @Inject("customnService") private readonly userService: UserService
  ) {}

  @Get("findOneByName")
  findOneByName(@Query() req: { name?: string }) {
    console.log("params::", req);
    return this.userService.findOneByName(req.name);
  }
}三、自定义注入值 useValue
user/user.module.ts
import { Module } from "@nestjs/common";
// 引入 UserService
import { UserService } from "./user.service";
import { UserController } from "./user.controller";

@Module({
  controllers: [UserController],
  // 依赖注入
  providers: [
    // 自定义名称
    {
      provide: "customnService",
      useClass: UserService,
    },
    // 自定义注入值
    {
      provide: "customValue",
      useValue: ["TB", "ALBB", "JD"],
    },
  ],
})
export class UserModule {}user/user.controller.ts
import { Controller, Get, Query } from "@nestjs/common";
import { UserService } from "./user.service";

@Controller({
  path: "user",
  // version: '1'
})
export class UserController {
  // 实例化 userService   @Inject 获取provider的service
  constructor(
    @Inject("customnService") private readonly userService: UserService,
    // 自定义注入值
    @Inject("customValue") private readonly workList[]
  ) {}

  @Get("findOneByName")
  findOneByName(@Query() req: { name?: string }) {
    console.log("params::", req);
    return this.userService.findOneByName(req.name) + this.workList;
  }
}工厂模式注入
如果服务之间有相互依赖或者逻辑处理, 可以使用 useFactory
user/user.module.ts
import { Module } from "@nestjs/common";
// 引入 UserService
import { UserService } from "./user.service";
import { UserService2 } from "./user.service2";
import { UserService3 } from "./user.service3";
import { UserController } from "./user.controller";

@Module({
  controllers: [UserController],
  // 依赖注入
  providers: [
    // 默认模版语法
    UserService,
    // 自定义名称
    {
      provide: "customnService",
      useClass: UserService,
    },
    // 自定义注入值
    {
      provide: "customValue",
      useValue: ["TB", "ALBB", "JD"],
    },
    UserService2,
    // 工厂模式注入  UserService2 UserService3 有某种逻辑关系
    {
      provide: "FactoryService",
      inject: [UserService2],
      useFactory: (UserService2: UserService2) => {
        return new UserService3(UserService2);
      },
    },
  ],
})
export class UserModule {}user/user.controller.ts
import { Controller, Get, Query } from "@nestjs/common";
import { UserService } from "./user.service";

@Controller({
  path: "user",
  // version: '1'
})
export class UserController {
  // 实例化 userService   @Inject 获取provider的service
  constructor(
    @Inject("customnService") private readonly userService: UserService,
    // 自定义注入值
    @Inject("customValue") private readonly workList: string[]
    // 工厂模式注入
    @Inject("FactoryService") private readonly factoryService:any
  ) {}

  @Get("findOneByName")
  findOneByName(@Query() req: { name?: string }) {
    console.log("params::", req);
    return this.userService.findOneByName(req.name) + this.workList;
  }
  @Get("findAll")
  findAll(@Query() req: { name?: string }) {
    console.log("params::", req);
    return this.userService.findOneByName(req.name) + this.factoryService.get()
  }
}5、异步工厂模式注入
userFactory 可以返回一个 promise 或者其他的异步操作
user/user.module.ts
import { Module } from "@nestjs/common";
// 引入 UserService
import { UserService } from "./user.service";
import { UserService2 } from "./user.service2";
import { UserService3 } from "./user.service3";
import { UserController } from "./user.controller";

@Module({
  controllers: [UserController],
  // 依赖注入
  providers: [
    // 异步 useFactory
    {
      provide: "AsyncFactoryService",
      async useFactory() {
        return await new Promise((resolve) => {
          setTimeout(() => {
            r('sync')
          }, 3000)
      }
    }
  ]
})
export class UserModule {}user/user.controller.ts
import { Controller, Get, Query } from "@nestjs/common";
import { UserService } from "./user.service";

@Controller({
  path: "user",
  // version: '1'
})
export class UserController {
  // 实例化 userService   @Inject 获取provider的service
  constructor(
    // 工厂模式注入
    @Inject("AsyncFactoryService") private readonly AsyncFactoryService: any
  ) {}
  @Get("findAll")
  findAll(@Query() req: { name?: string }) {
    console.log("params::", req);
    return (
      this.userService.findOneByName(req.name) + this.AsyncFactoryService()
    );
  }
}第十一章 nestjs 模块
每一个 Nest 应用程序至少有一个模块,即根模块。根模块是 Nest 开始安排应用程序树的地方。事实上,根模块可能是应用程序中唯一的模块,特别是当应用程序很小,但是对于大型程序来说这是没有意义的。在大多数情况下,您将拥有多个模块,每个模块都有一组紧密相关的功能。
1. 基本用法
当我们使用 nest g res user 创建一个 CURD 模版的时候, nestjs 会自动帮我们引入模块,即 /user/app.module.ts
...
import { UserModule } from './user/user.module'
...

@Module({
  imports: [UserModule],
  controllers: [AppController],
  providers: [AppService]
})

export class AppModule{}2. 共享模块
user 的 Service 想暴露给其它模块使用就可以使用 exports 导出该服务
/user/user.service.ts
...
import { UserService } from './user.service'
...

@Global()
@Module({
  controllers: [UserController],
  providers: [UserService],
  // 导出该服务
  exports: [UserService]
})/app.module.ts
...
import { UserModule } from './user/user.module'
...

@Module({
  imports: [UserModule],
  ...
})/app.controller.ts
...
import { UserService } from './user/user.service'
...

@Controller()
export class AppController {
  constructor(
    ...
    private readonly userService: UserService
    ...
  ) {}

  @Get()
  getHello(): string {
    return this.userService.getHello()
  }
}3. 全局模块 @Global()
给 user 模块添加 @Global() , 它便注册为了全局模块
/user/user.module.ts
...
@Global()
@Module({
  ...
})

export class UserModule{}在其他模块使用,无须在 .module.ts 中 import 导入
/list/list.controller.ts
...
import { UserService } from '../user/user.service'

@Controller('list')
export class ListController {
  constructor(
    ...
    private readonly userService: UserService
    ...
  ) {}

  @Get()
  findAll(): string {
    return this.userService.findAll()
  }

}4. 动态模块
动态模块主要是为了给模块传递参数,可以给该模块添加一个静态方法,用来接收参数
/config/config.module.ts
import { Module, DynamicModule, Global } from '@nestjs/common';

interface ConfigOptions {
  path: string
}

@Global()
@Module({}}

export class ConfigModule {
  static forRoot(options: ConfigOptions): DynamicModule {
    return {
      module: ConfigModule,
      providers: [
        {
          provide: 'Config',
          useValue: { baseApi: '/api' + options.path }
        },
      ],
      exports: [
        {
          provide: 'Config',
          useValue: { baseApi: '/api' + options.path }
        }
      ],
    }
  }
}/app.module.ts
...
import { ConfigModule } from './config/config.module'

@Module({
  imports: [
    ...
    ConfigModule.forRoot({ path: '/darkcity' })
  ],
  ...
})

export class AppModule {}第十二章 nestjs 中间件
中间件:在路由处理程序之前调用的函数。中间件函数可以访问请求和响应对象
中间件可以执行以下任务:
- 执行任何代码
- 对请求和响应对象进行更改
- 结束请求-响应周期
- 调用堆栈中的下一个中间函数
- 如果当前的中间件函数没有结束请求-响应周期,他必须调用
next()将控制传递给下一个中间件函数。否则,请求将被挂起。
1. 创建一个依赖注入中间件
要求我们实现 use 函数,返回 req、res、nest 参数,如果不调用 next 程序将被挂起
import { Injectable, NestMiddleware } from '@nestjs/common'
import { Request, Response, NestFunction } from 'expree'

@Injectable()
exporr class Logger implements NestMiddleware {
  use(req: Request, res: Response, next: NextFunction) {
    console.log(req)
    next()
  }
}使用方法:在模块里面实现 configure 返回一个消费者 comsumer 通过 apply 注册中间件,通过 forRultes 指定 Controller 路由
import { Module, NestModule, MiddlewareConsumer } from "@nestjs/common";
import { UserService } from "./user.service";
import { UserController } from "./user.controller";
import { Logger } from "src/middleware";

@Module({
  controllers: [UserController],
  providers: [UserService],
  exports: [UserService],
})
export class UserModule implements NestModule {
  configure(consumer: MiddlewareConsumer) {
    consumer.apply(Logger).forRoutes("user");
  }
}也可以指定拦截的方法,比如拦截 GET、POST 等使用对象配置
import {
  Module,
  NestModule,
  MiddlewareConsumer,
  RequestMethod,
} from "@nestjs/common";
import { UserService } from "./user.service";
import { UserController } from "./user.controller";
import { Logger } from "src/middleware";

@Module({
  controllers: [UserController],
  providers: [UserService],
  exports: [UserService],
})
export class UserModule implements NestModule {
  configure(consumer: MiddlewareConsumer) {
    consumer.apply(Logger).forRoutes({
      path: "user",
      method: RequestMethod.GET,
    });
  }
}还可以直接把 UserController 注册为中间件
import {
  Module,
  NestModule,
  MiddlewareConsumer,
  RequestMethod,
} from "@nestjs/common";
import { UserService } from "./user.service";
import { UserController } from "./user.controller";
import { Logger } from "src/middleware";

@Module({
  controllers: [UserController],
  providers: [UserService],
  exports: [UserService],
})
export class UserModule implements NestModule {
  configure(consumer: MiddlewareConsumer) {
    consumer.apply(Logger, UserController).forRoutes(UserController);
  }
}2. 全局中间件
注意:全局中间件只能使用函数式写法。场景可以做白名单等
import { NestFactory } from "@nestjs/core";
import { AppModule } from "./app.module";

const whiteList = ["/list"];

function middleWare(req, res, next) {
  console.log("全局中间件~");
  if (whiteList.includes(req.originalUrl)) {
    next();
  } else {
    res.send("路由被拦截");
  }
}

async function bootstrap() {
  const app = await NestFactory.create(AppModule);
  app.use(middleWare);
  await app.listen(3000);
}

bootstrap();接入第三方中间件
案例:处理 cors 跨域问题
pnpm i cors -S

pnpm i @types/cors -Dimport { NestFactory } from "@nestjs/core";
import { AppModule } from "./app.module";
import * as cors from "cors";
async function bootstrap() {
const app = await NestFactory.create(AppModule);
app.use(cors());
await app.listen(3000);
}
bootstrap();第十三章 nestjs 上传图片-静态目录
依赖包安装 @nestjs/platform-express 这个包 nestjs 已经集成就不用安装了
// multer包
pnpm i multer -S

// multer声明包
pnpm i @types/multer -D配置
在 upload/module 中使用 MulterMudole register 注册存放图片的目录。需要用到 multer 的 diskStorage 设置存放目录 extname 用来读取文件后缀 filename 给文件重命名
/upload/upload.module.ts
import { Module } from '@nestjs/common'
import { UploadService } from './upload.service'
import { UploadController } from './upload.controller'
import { MulterModule } from '@nestjs/platform-express'
import { diskStorage } from 'multer'
/**
 * extname:去文件名的后缀
 * join:拼接
*/
import { extname, join } from 'path'

@Module({
  imports: [
    MulterModule.register({
      storage: diskStorage({
        // 存放目录
        destination: join(__dirname, '../images')
        // 重命名
        filename: (_, file, callback) => {
          /**
           * file.originlname 上传文件的原始名称
           * */
          const fileName = `${new Date().getTime() + extname(file.originlname)}`
          return callback(null, fileName)
        }
      })
    })
  ],
  controller: [UploadController],
  providers: [UploadService]
})在 controller 中使用
使用 UserInterceptors 装饰器 。FileInterceptor 是单个读取字段名称。FilesInterceptor 是多个参数。使用 UploadedFile 装饰器接收 file 文件
/upload/upload.controller.ts
import {
  Controller,
  Post,
  UserInterceptors,
  UploadedFile,
} from "@nestjs/common";
import { UploadService } from "./upload.service";
import { FileInterceptor } from "@nestjs/platform-express";

@Controller("upload")
export class UploadController {
  constructor(private readonly uploadService: UploadService) {}

  /**
   * UserInterceptors 中间件装饰器:协助我们处理文件
   * UploadedFile 参数装饰器
   * */
  @Post(album)
  @UserInterceptors(FileInterceptor("file"))
  upload(@UploadedFile() file) {
    console.log(file);
    return true;
  }
}生成静态目录访问上传之后的图片
/main.ts
import { NestFactory } from "@nestjs/core";
import { AppModule } from "./app.module";
import { NestExpressApplication } from "@nestjs/platform-express";
import { join } from "path";

async function bootstrap() {
  const app = await NestFactory.create<NestExpressApplication>(AppModule);
  app.useStaticAssets(join(__dirname, "images"), {
    prefix: "/xiaoman",
  });
  await app.listen(3000);
}

bootstrap();第十四章 nestjs-文件下载
1. download 直接下载
*文件信息应该存数据库,这里直接是写死的
import {
  Controller,
  Get,
  Res,
  UseInterceptors,
  UploadedFile,
} from "@nestjs/common";
import { UploadService } from "./upload.service";
import { FileInterceptor, FilesInterceptor } from "@nestjs/platform-express";
import type { Response } from "express";
import { join } from "path";

@Controller("upload")
export class UploadController {
  constructor(private readonly uploadService: UploadService) {}

  @Get("album")
  @UseInterceptors(FileInterceptor("file"))
  upload(@UploadedFile() file) {
    console.log("file", file);
    return true;
  }

  @Get("export")
  downLoad(@Res() res: Response) {
    const url = join(__dirname, "images/123456.jpg");
    res.download(url);
  }
}文件流的方式下载
可以使用 compressing 把它压缩成一个 zip 包
...
import { zip } from "compressing";

@Get("strem")
async down(@Res() res: Response) {
  const url = join(__dirname, '../images/123456.jpg');
  const tarStream = new zip.Stream();
  await tarStream.addEntry(url);

  res.setHeader("Content-Type", "application/octet-stream");
  res.setHeader("Content-Disposition", "attachment; filename=123456.zip");
  tarStream.pipe(res);
}
}前端接收流下载
const useFetch = async (url) => {
  const res = await fetch(url).res => res.arrayBuffer();

  const a = document.createElement('a');
  a.href = URL.createObjectURL(new Blob([res], {
    // type: "image/png"
  }));
  a.download = '123456.zip';
  a.click();
}

const download = async () => {
  useFetch('http://localhost:3000/upload/strem');
}第十五章 nestjs-RxJs
为什么介绍 RxJs? 因为 NestJS 已经集成了 RxJs,并且也会用到 Rxjs 的一些 API。
1. RxJs
RxJS 是一个使用 Observable 序列来处理异步和基于事件的编程的库。它提供了丰富的操作符,用于处理序列、实现数据流和编写异步程序。RxJS 是响应式编程的 JavaScript 实现,它让开发者可以更容易地编写异步代码,处理事件和数据流,以及利用函数式编程的思想来简化复杂的异步逻辑。
RxJS 的强大之处在于它的组合能力,通过链式调用操作符,可以轻松地组合复杂的异步逻辑。它使得异步数据处理更加直观和灵活,同时提供了丰富的工具和操作符来处理异步数据流。
核心概念包括:
Observable:表示一个异步数据流,可以发出零个或多个值,以及可能产生一个错误或者正常结束。开发者可以订阅 Observable,以便接收它发出的值,或对其进行转换、过滤、合并等操作。
Operator:提供了丰富的操作符(Operators),用于对 Observable 进行各种操作。例如,map 用于将 Observable 发出的值进行转换,filter 用于筛选满足条件的值,merge 用于合并多个 Observable 等。
Subscription: 代表对 Observable 的一次订阅。订阅后,可以接收 Observable 发出的值,也可以取消订阅以释放资源。
Subject: 是一个特殊的 Observable,它可以用来多播(multicast)数据给多个订阅者。
案例 1
场景:类似于迭代器 next 发出通知, complete 通知完成
subscribe 订阅 Observable,接收 Observable 发出的值,并打印出来
import { Observable } from "rxjs";

/**
 * next 发出通知  complete通知完成
*/
const observable = new Observable(() => {
  subscriber.next(1)
  subscriber.next(2)
  subscriber.next(3)

  setTimeout(() => {
    subscriber.next(4)
    subscriber.complete()
  }
})

observable.subscribe({
  next: (value) => {
    console.log(value)
  }
})案例 2
import { Observable, interval, take } from "rxjs";
import { map, filter, reduce, find, findIndex } from "rxjs/operators";

const subs = interval(500)
  .pipe(
    map((v) => ({ num: v })),
    filter((v) => v.num % 2 === 0)
  )
  .subscribe((e) => {
    console.log(e);
    if (e.num == 10) {
      subs.unsubscribe();
    }
});第十六章 nest 响应拦截器
拦截器具有一系列的功能,这些功能受面向切面编程(AOP)技术的启发。它们可以:
- 在函数执行之前/之后绑定额外的逻辑
- 转换从函数返回的结果
- 转换从函数抛出的异常
- 扩展基本函数行为
- 根据所选条件完全重写函数(例如,缓存目的)
统一接口格式: 返回一个标砖的 json 格式,给数据做一个全局的 format
{
  data,
  status: 0,
  success: true,
  message: "成功"
}新建 common 文件夹,创建 response.ts , Nestjs 配合 Rxjs 格式化数据
import { Injectable, NestInterceptor, callHandler } from '@nestjs/common'
import { map } from 'rxjs/operators'
import { Observable } from 'rxjs'

interface data<T> {
  data: T
}

@Injectable()
export class Response<T = any>implements NestInterceptor {
  intercept(context, nest: CallHandler): Observable<data<T>> {
    return next.handle().pipe(map(data => {
      return {
        data,
        status: 0,
        success: true,
        message: "成功"
      }
    }))dai
  }
}在 main.ts 注册
...
import { Response } from './common/response'

...
app.useGlobalInterceptors(new Response)
...第十七章 nestjs 异常拦截器
上一章讲了全局相应拦截器,这章说全局异常拦截器。
/common 下新建 errorFilter.ts
创建一个异常过滤器,它负责捕获作为 HttpException 类实例的异常,并为它们设置自定义响应逻辑。为此,我们需要访问底层平台 Request 和 Response。我们将访问 Request 对象,以便提取原始 url 并将其包含在日志信息中。我们将使用 Response.json() 方法,使用 Response对象 直接控制发送的响应
import {
  ExceptionFilter,
  Catch,
  ArgumentsHost,
  HttpException,
} from "@nestjs/common";
import { Request, Response } from "express";

@Catch(HttpException)
export class HttpErrorFilter implements ExceptionFilter {
  catch(exception: HttpException, host: ArgumentsHost) {
    const ctx = host.switchToHttp();
    const request = ctx.getRequest<Request>();
    const response = ctx.getResponse<Response>();

    const status = exception.getStatus();

    response.status(status).json({
      data: exception.message,
      time: new Date().getTime(),
      success: false,
      path: request.url,
      status,
    });
  }
}注册全局异常过滤器
....
import { HttpErrorFilter } from './common/errorFilter'

...
app.useGlobalFilters(new HttpErrorFilter())
...第十八章 nestjs 管道转换

管道(Pipe)用于对传入的数据进行转换、验证和处理。管道允许我们在数据到达处理程序之前和之后对其进行处理。
管道可以做以下事情:
数据转换:将前端传入的数据转换成我们需要的数据
数据验证:验证传入的数据是否符合特定的要求,例如格式、类型等。类似于前端的 rules
Nestjs 提供了八种内置转换 API:
- ValidationPipe
- ParseIntPipe
- ParseFloatPipe
- ParseBoolPipe
- ParseArrayPipe
- ParseUUIDPipe
- ParseEnumPipe
- DefaultValuePipe
1. 动态参数数据格式转换
/user/user.controller.ts
import { Controller, Get, Query, ParseIntPipe } from '@nestjs/common';
import { UserService } from './user.service';

@Controller('user')
export class UserController {
  constructor(private readonly userService: UserService) {}

  @Get(":id")
  // 原始代码
  // findOne(@Param('id') id: string) {
  findOne(
    @Param('id', ParseIntPipe) id: string
  ) {
    return this.userService.findOne(id);
  }
}验证 UUID
安装 UUID
pnpm i uuid -S
pnpm i @types/uuid -Dimport { Controller, Get, Param, ParseUUIDPipe } from "@nestjs/common";
import { UserService } from "./user.service";
import * as uuid from "uuid";
// 生成uuid
console.log(uuid.v4());
@Controller("user")
export class UserController {
constructor(private readonly userService: UserService) {}
@Get(":id")
findOne(@Param("id", ParseUUIDPipe) id: string) {
return this.userService.findOne(id);
}
}第十九章 nestjs 管道验证 DTO
nest g pi user1. 创建一个 pipe 文件
/user/user.pipe.ts
import { ArgumentMetadata, Injectable, PipeTransform } from "@nestjs/common";

@Injectable()
export class UserPipe implements PipeTransform {
  transform(value: any, metadata: ArgumentMetadata) {
    return value;
  }
}2. 安装验证器
pnpm i class-validator class-transformer -S/user/user.dto.ts
import { IsNotEmpty, IsString } from "class-validator";

export class CreateUserDto {
  @IsNotEmpty() // 验证是否为空
  @IsString() // 验证是否字符串
  name: string;

  @IsNotEmpty()
  age: number;
}3. Controoler 使用管道和定义类型
/user/user.controller.ts
import { Controller, Post } from "@nestjs/common";
import { UserService } from "./user.service";
import { UserPipe } from "./user.pipe";
import { CreateUserDto } from './dto/user.dto'

// 生成uuid
console.log(uuid.v4());

@Controller("user")
export class UserController {
  constructor(private readonly userService: UserService) {}

  @Post()
  create(@Body(UserPipe createUserDto: CreateUserDto)) {
    return this.userService.findOne(createUserDto);
  }
}4. 实现验证 transform
/user/user.pipe.ts 代码中的 value 就是前端传过来的数据, metaData 就是元数据, 通过 metatype 可以实例化这个类
示例化 DTO
import { ArgumentMetadata, Injectable, PipeTransform } from "@nestjs/common";
//
import { plainToInstance } from "class-transformer";

@Injectable()
export class UserPipe implements PipeTransform {
  transform(value: any, metadata: ArgumentMetadata) {
    // 实例化 DTO
    const DTO = plainToInstance(metadata.metatype, value);

    const errrors = await validate(DTO);
    if (errors.length > 0) {
      throw new HttpException(errors, HttpStatus.BAD_REQUEST);
    }
    return value;
  }
}5.注册全局 DTO 验证管道
和自己写的效果类似
/main.ts
...
import { ValidationPipe } from '@nestjs/common';

...
app.useGlobalPipes(new ValidationPipe())
...第二十章 nestjs 爬虫
第二十一章 nestjs 守卫
守卫:守卫有一个单独的责任。他们根据运行时出现的某些条件(如权限、角色、访问控制列表等)来确定给定的请求是否由路由程序处理。这通常称之为授权。仔传统的 Express 应用程序中,通常由中间件处理授权以及认证。中间件时身份验证的良好选择,因为诸如 token 验证或添加属性到 request 对象上与特定路由及其元数据没有强关联
tips: 守卫再每个中间件之后执行,但是再任何拦截器或者管道之前执行
1. 创建守卫
nest g gu [name]/user/user.guard.ts
import { CanActive, ExecutionContext, Injectable } from "@nestjs/common";
import { Observable } from "rxjs";

@Injectable()
export class UserGuard implements CanActive {
  canActivate(
    // 给定上下文参数
    context: ExecutionContext
  ): boolean | Promise<boolean> | Observable<boolean> {
    // 守卫逻辑
    return true;
  }
}守卫要求实现函数,给定参数 context 执行上下文, 要求返回布尔值
2. 使用守卫
/user/user.controller.ts
import { Controller, Get, UseGuards } from '@nestjs/common'
...
import { UserGuard } from './user.guard'

@Controller('user')
@UseGuards(UserGuard)
export class UserController {
  constructor(private readonly userService: UserService) {}

  ...
}3. 全局守卫
main.ts
...
import { UserGuard } from './user/user.guard'

...
app.useGlobalGuards(new UserGuard())
...4. 针对角色控制守卫
SetMetadata 装饰器:
- 第一个参数 key
- 第二个参数自定义:是数组格式,用来存放权限的
user/user.controller.ts
...
import { Controller, Get, SetMetadata } from '@nestjs/common'

@Controller('user')
@UseGuards(UserGuard)
export class UserController {
  constructor(private readonly userService: UserService) {}


  @Get()
  @SetMetadata('roles', ['admin'])
  findAll() {
    return this.userService.findAll()
  }
}guard 使用 Reflector 反射读取 setMetaData 的值,去做判断这边例子是从 url 中判断有没有 admin 权限
/user/user.guard.ts
import { CanActive, ExecutionContext, Injectable } from "@nestjs/common";
import { Observable } from "rxjs";
import { Reflector } from "@nestjs/core";
import type { Request } from "express";

@Injectable()
export class UserGuard implements CanActive {
  canActivate(
    context: ExecutionContext
  ): boolean | Promise<boolean> | Observable<boolean> {
    const admin = this.Reflector.get<string[]>("role", context.getHandler());
    const request = context.switchToHttp().getRequest<Request>();
    return admin.includes(request.query.role as string);
  }
}访问:
- 成功:
http://localhost:3000/user?role=admin - 失败:
http://localhost:3000/user
场景设想:免登录接口
第二十二章 nestjs 自定义装饰器
在 nestjs 中我们使用了大量的装饰器 decorator, 所以 nestjs 也允许我们去自定义装饰器
1. 自定义权限装饰器
nest g d [name]/user/user.decorator.ts
import { SetMetadata } from "@nestjs/common";

export const UserRoles = (roles: string[]) => {
  console.log("user decorator", roles);
  SetMetadata("roles", roles);
};/user/user.controller.ts
...
import { UserRoles } from './user.decorator'

export class UserController {
  @Get()
  @UserRoles(["admin"])
  findAll() {
    return this.userService.findAll()
  }
}2. 自定义参数装饰器返回一个 url
/user/user.decorator.ts
import {
  SetMetadata,
  createParamDecorator,
  ExecutionContext,
  applyDecorators,
} from "@nestjs/common";

export const ReqUrl = createParamDecorator(
  (data: string, ctx: ExecutionContext) => {
    const req = ctx.switchToHttp().getRequest<Request>();
    return req.url;
  }
);/user/user.controller.ts
...
import { UserRoles, ReqUrl } from './user.decorator'

export class UserController {
  @Get()
  @UserRoles(["admin"])
  findAll(@ReqUrl() url) {
    return this.userService.findAll()
  }
}第二十三章 nestjs swagger
swagger 用于提供给前端接口文档
pnpm i @nestjs/swagger swagger-ui-express -S| 装饰器 | 装饰项 |
|---|---|
| @ApiOperation() | Controller/Method |
| @ApiRespons() | Controller/Method |
| @ApiProduces() | Controller/Method |
| @ApiConsumes() | Controller/Method |
| @ApiBearerAuth() | Controller/Method |
| @ApiOAuth2() | Controller/Method |
| @ApiBasicAuth() | Controller/Method |
| @ApiSecurity() | Controller/Method |
| @ApiExtraModels() | Controller/Method |
| @ApiBody() | Method |
| @ApiParam() | Method |
| @ApiQuery() | Method |
| @ApiHeader() | Controller/Method |
| @ApiExcludeEndpoint() | Controller/Method |
| @ApiTags() | Controller/Method |
| @ApiProperty() | Model |
| @ApiPropertyOptional() | Model |
| @ApiHideProperty() | Model |
| @ApiExtension() | Model |
1. 注册 swagger
/main.ts
...
import { SwaggerModule, DocumentBuilder } from '@nestjs/swagger';

async function bootstrap() {
  const app = await NestFactory.create<NestExpressApplication>(AppModule);
  const options = new DocumentBuilder()
    .setTitle("Nestjs Swagger")
    .setDescription("The Nestjs API description")
    .setVersion("1.0")
    .build();
  const document = SwaggerModule.createDocument(app, options);
  SwaggerModule.setup("/api-docs", app, document);
  await app.listen(3000);
}
bootstrap();2. 添加分组
使用 ApiTags 添加分组
/user/user.controller.ts
...
import { ApiTags } from '@nestjs/swagger'

@Controller('user')
@ApiTags('用户模块')
export class UserController {
  ...
}3. 添加接口描述
使用 ApiOperation 接口描述修饰符
/user/user.controller.ts
...
import { ApiTags } from '@nestjs/swagger'

@Controller('user')
@ApiTags('用户模块')
export class UserController {
  ...

  @Get()
  @ApiOperation({
    summary: '获取所有用户',
    description: '获取所有用户的接口描述'
  })
  findAll(@ReqUrl() url:string) {
    console.log('url::', url);
    return this.userService.findAll()
  }
}4. 添加接口 param 参数说明
使用 ApiParam 参数说明修饰符
/user/user.controller.ts
@ApiParam({ name: 'id', description: '用户id', required: true })5. 添加接口 query 参数说明
使用 ApiQuery 参数说明修饰符
/user/user.controller.ts
@ApiQuery({ name: 'id', description: '用户id', required: true })6. 定义 post 请求参数
使用 ApiProperty 定义 post
/user/create-user.dto.ts
import { ApiProperty } from "@nestjs/swagger";

export class CreateUserDto {
  @ApiProperty({ description: "用户名", example: "张三" })
  name: string;

  @ApiProperty({ description: "年龄", example: 20 })
  age: number;
}/user/user.controller.ts
@Controller("users")
export class UserController {
  @Post()
  create(@Body() createUserDto: CreateUserDto) {
    // 在这里可以访问 createUserDto.roles 数组
  }
}7. 定义响应体
使用 ApiResponse 定义响应体
@ApiResponse({status:403,description:"自定义返回信息"})
第二十四章 nestjs 连接数据库
ORM 框架(typeOrm)
typeOrm 是 TypeScript 中最成熟的对象关系映射器(ORM)。因为它是用 typescript 写的,所以可以很好的与 nestjs 集成
pnpm i @nestjs/typeorm typeorm mysql2 -S在本地新建数据
在 app.module.ts 中注册使用数据库
...
import { TypeOrmModule } from '@nestjs/typeorm';
...

@Module({
  imports: [
    TypeOrmModule.forRoot({
      type:'mysql', // 数据库类型
      host: 'localhost', // host
      port: 3306, // 端口
      username: 'root', // 数据库账号
      password: '123456', // 数据库密码
      database: 'test', // 数据库名称
      entities: [__dirname + '/**/*.entity{.ts,.js}'], // 实体文件
      // synchronize: true, // 是否自动将实体类同步到数据表
      // retryDelay: 1000, // 重试连接数据库间隔
      // retryAttempts: 3, // 重试次数
      // autoLoadEntities: true, // 是否自动加载实体类
    })
  ],
  controllers: [AppController],
  providers: [AppService],
})创建实体类
/user/user.entity.ts
import { Entity, Column, PrimaryGeneratedColumn } from "typeorm";

@Entity()
export class User {
  @PrimaryGeneratedColumn()
  id: number;

  @Column()
  name: string;
}关联实体
/user/user.module.ts
...
import { TypeOrmModule } from '@nestjs/typeorm';
import { User } from './user.entity';

@Module({
  imports: [
    typeOrmModule.forFeature([User]), // 关联实体
  ],
  controllers: [UserController],
  providers: [UserService],
})

export class UserModule {}第二十五章 nestjs 实体
实体:是一个映射到数据库表的类型。可以通过定义一个新类来创建一个实体,并用 @Entity() 来标记
import { Entity, Column, PrimaryGeneratedColumn } form 'typeorm'

@Entity()
export class Test {
  @PrimaryGeneratedColumn()
  id: number

  @Column()
  name: string

  @Column()
  password: string

  @Column()
  age: number
}- 主列:
// 自动递增的主键
@PrimaryGeneratedColumn()
id: number

// 自动递增的uuid
@PrimaryGeneratedColumn('uuid')
id: string- 列类型
@Column({
  type: 'varchar',
  length: 200,
})
password: string


@Column({ type: 'int' })
age: number

@CreateDateColumn({ type: 'timestamp' })
createTime: Datemysql 类型: init , tinyint, smallint, mediumint, bigint, float, double, dec, decimal, numeric, date, datetime, timestamp, time, year, char, varchar, nvarchar, text, tinytext, mediumtext, blob, longtext, longtext, enum, set, binary, varbinary, geometry, point, linestring, polygon, multipoint, multilinestring, multipolygon, geometrycollection, json, jsonb, unsigned, signed, spatial
- 自动生成列
@Generated('uuid')
uuid: string- 枚举列
@Column({
  type: "enum",
  enum: ['1', '2', '3', '4'],
  default: '1',
})
xx: string- 列选项
@Column({
  type: 'varchar',
  name: "xxx", // 数据库表中的列名
  nullable: true, // 数据库中使列 NULL 或 NOT NULL。默认情况下,列是nullable: false
  comment: "注释",
  select: true, // 定义在进行查询时是否默认隐藏次列。设置为false时,列数据不会显示标准查询
  default: "默认值", // 列的默认值
  primary: false, // 定义列是否为主键。默认情况下,列是not primary。使用方式和 @PrimaryColumn() 一样
  unique: false, // 定义列是否为唯一。默认情况下,列是not unique。使用方式和 @Unique() 一样
  update: false, // 定义列是否可更新。默认情况下,列是可更新的。使用方式和 @UpdateDateColumn() 一样
  collation: "", // 定义列的排序规则
})ColunmOptions 中可用选项列表:
- type: ColumnType 列类型。
- name: string 列名。
- length: string 列长度。
- width: number 列类型的显示范围。 仅用于 MySQL integer types(opens new window) ...
simple-array
有一种称为 simple-array 的特殊列类型,他可以将原始数组存储在单个字符串列中。
@Entity()
export class Test {
  @PrimaryGeneratedColumn()
  id: number;

  @Column({ type: "simple-array" })
  names: string[];
}simple-json
有一种称为 simple-array 的特殊列类型,他可以将原始数组存储在单个字符串列中。
@Entity()
export class Test {
  @PrimaryGeneratedColumn()
  id: number;

  @Column({ type: "simple-array" })
  names: string[];
}