React 基础
一、React 介绍
什么是 React?
React 有 Meta 公司研发,是一个用于 构建 Web 和原生交互界面的库。
- 开发 B 端应用
- 开发原生应用
React 优势
相较于传统基于 DOM 开发的优势
组件化的开发方式
不错的性能
相较于其他前端框架的优势
丰富的生态
跨平台支持
社区活跃
二、React 开发环境准备
使用 create-react-app 快速搭建开发环境。create-react-app是一个快速创建 React 开发环境的工具,底层由 webpack 构建,封装了配置细节,开箱即用。
- 执行命令: npx create-react-app react-basic
npx:Nodejs 工具命令,查找并执行后续的包命令。create-react-app:核心包(固定写法),创建 React 项目的命令。react-basic:项目名称。
- 或者全局安装
create-react-app工具:
// 全局安装react脚手架
npm i -g create-react-app

// 创建工程
create-react-app react-basic三、脚手架模版目录介绍
├── README.md
├── package-lock.json
├── package.json
├── public
│   ├── favicon.ico
│   └── index.html HTML模板文件
└── src
    ├── App.js 根组件
└── index.js 入口文件四、JSX
4.1 JSX 介绍
** 什么是 JSX**: JSX 是 javascript 和 XML 的缩写,表示在 js 代码中编写 HTML 模版结构,它是 react 中编写 UI 模版的方式
const message = 'this is message'

function App() {
  return (
    <div>
      <h1>this is title: {message}</h1>
    </div>
  )
}优势:
- HTML 的声明式模版写法
- JS 的可编程能力
** JSX的本质 **: JSX 并不是标准的 JS 语法,它是 JS 的语法扩展,浏览器本身不能识别,需要通过 解析工具解析 才能被浏览器识别
<div>this is JSX</div>


>>>> babel >>>>

import { jsx as _jsx } from 'react/jsx-runtime'

/*#__PURE__*/_jsx("div", {
    children: "this is JSX"
});4.2 JSX 语法
在 JSX 中可以通过 大括号{} 识别 JavaScrip 中的表达式,比如常见的变量、函数调用、方法调用等等。
- 使用引号传递字符串
function App() {
  return (
    <div>
      this is App
      {/* 使用引号传递字符串 */}
      {'this is message'}
    </div>
  )
}- 使用 JavaScrip 变量
const count = 10
function App() {
  return (
    <div>
      this is App
      {/* 识别js变量 */}
      {count}
    </div>
  )
}- 函数调用和方法调用
function getName() {
  return '张三'
}
function App() {
  return (
    <div>
      this is App
      {/* 函数调用 */}
      {getName()}
      {/* 方法调用 */}
      {new Date().getDate()}
    </div>
  )
}- 使用 JavaScript 对象
function getName() {
  return '张三'
}
function App() {
  return (
    {/* 使用js对象 */}
    <div style={{ color:'red' }}>
      this is App
    </div>
  )
}- 在 JSX 中实现列表渲染:可以使用原生 JS 中的
map方法遍历渲染列表
const list = [
  {
    id: 1001,
    name: '张三'
  },
  {
    id: 1002,
    name: '李四'
  },
  {
    id: 1003,
    name: '王二'
  }
]

function App() {
  return (
    <div>
      {list.map((v) => (
        <li key={item.id}>{item.name}</li>
      ))}
    </div>
  )
}- 在
JSX中条件判断渲染
const isLogin = true

function App() {
  return (
    <div className="App">
      {/** 逻辑 与 **/}
      {isLogin && <div>this is span</div>}
      {/** 三元运算 **/}
      {isLogin ? <div>this is span</div> : <div>this is span2</div>}
    </div>
  )
}

export default App复杂场景的条件判断。 需求:列表中需要根据文章状态适配三种情况,单图、三图和无图三种模式 解决方案: 自定义函数 + if 判断语句
const articleType = 1 // 0 1 2
function getArticleItemType() {
  articleType === 0 ? '单图' : articleType === 1 ? '三图' : '无图'
}

function App() {
  return <div className="App">{getArticleItemType()}</div>
}

export default App- 基础事件绑定
语法:on + 事件名称 = {事件处理程序}, 整体遵循驼峰命名法。
function App() {
  const handleClick = () => {
    console.log('this is click')
  }
  return <button onClick={handleClick}>this is button</button>
}

export default App传递自定义参数:事件绑定的位置改造成箭头函数的写法,在执行 clickHandler 实际处理业务函数的时候传递实参
function App() {
  const handleClick = (name) => {
    console.log('this is click' + name)
  }
  return <button onClick={() => handleClick('张三')}>this is button</button>
}

export default App同时传递事件对象实参 e 和自定义参数,clickHandler 中声明形参
function App() {
  const handleClick = (name, e) => {
    console.log('this is click' + name)
  }
  return <button onClick={(e) => handleClick('张三', e)}>this is button</button>
}

export default App五、React 组件
概念: 一个组件就是用户界面的一部分,它可以有自己的逻辑和外观,组件之间可以互相嵌套,也可以额服用多次
** React组件 **: 一个组件就是首字母大写的函数,内部存放了组件的逻辑和视图 UI,渲染组件只需要把组件当成标签书写即可
// 组件定义
function Button() {
  // 组件内部逻辑
  return <button>this is button</button>
}

// 使用组件
function App() {
  return <Button />
}六、基础样式控制
6.1 行内样式(不推荐)
<div style={{ color: 'red' }}>this is div</div>6.2 class 类名控制
.foo {
  color: red;
}import './index.css'
function App() {
return <div className="foo">this is div</div>
}七、 受控表单
八、组件通信
概念:组件通信就是组件之间的数据传递,根据组件嵌套关系的不同,有不同的通信方法
8.1 父子组件通信 A -> B
父传子
子传父
8.1.1 父组件传递数据给子组件
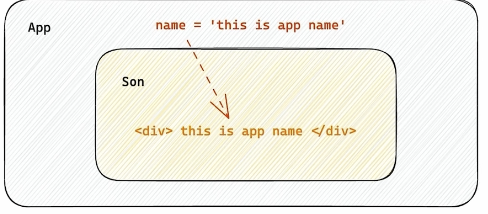
实现步骤:
父组件传递数据 - 在子组件标签上绑定属性
子组件接受数据 - 子组件通过
props参数接受数据
function Father() {
  const name = 'this is father'
  return (
    <div>
      <Son name={name} />
    </div>
  )
}function Son(props) {
// props: 对象里面包含了父组件传递过来的所有的数据
console.log(props)
return <div>this is son: {props.name}</div>
}父传子 props 说明:
props 可以传递任意的数据: 数字、字符串、布尔值、数组、对象、函数、JSX
props 是只读对象: 子组件只能读取 props 中的数据,不能直接进行修改,父组件的数据只能由父组件修改
** 特殊的prop children **: 当把内容嵌套在子组件标签中时,父组件会自动在名为 children 的 props 属性中接受该内容
<Son>
  <span>这是一个span</span>
</Son>

/***
 * props: {
 *  children: <span />
 * }
*/8.1.2 子组件传递给父组件
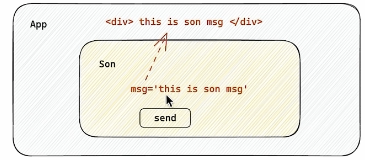
核心思路:在子组件中调用父组件中的函数并传递参数
function Father() {
  const name = 'this is father'
  // 4. 定义父组件状态变量
  const [msg, setMsg] = useState('')

  // 3. 声明父组件的方法,并且用参数接收子组件传递过来的数据
  const getMsg = (msg) => {
    console.log(msg)
    // 赋值给状态变量
    setMsg(msg)
  }

  return (
    <div>
      {/* 给子组件传递方法函数 */}
      <Son name={name} onGetSonMsg={getMsg} />
      <span>{msg}</span>
    </div>
  )
}function Son({ onGetSonMsg }) {
// 1. 声明需要传给父组件的数据
const sonMsg = 'this is son'
return (
<div>
this is son: {props.name}
{/* 2. 调用父组件的方法并传递数据 */}
<button onClick={() => onGetSonMsg(sonMsg)}>sendMsg</button>
</div>
)
}8.2 兄弟组件通信 B -> C
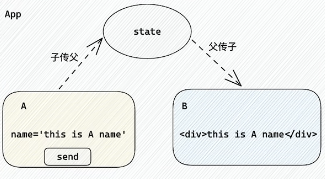
实现思路:借助 状态提升 机制, 通过父组件进行兄弟组件之间的数据传递
A 组件先通过子传父的方式把数据传给父组件
父组件拿到数据后通过父传子的方式在传递给 B 组件
function App() {
  const [name, setName] = useState('')
  const getMsg = (msg) => {
    console.log(msg)
    setName(msg)
  }
  return (
    <div>
      <A onGetMsg={getMsg} />
      <B />
    </div>
  )
}function A({ onGetMsg }) {
const name = 'this is A component'
return (
<div>
this is A component
<button onClick={() => onGetMsg(name)}>send</button>
</div>
)
}function B({ name }) {
return (
<div>
this is B component
{name}
</div>
)
}8.3 跨层级组件通信 A -> E
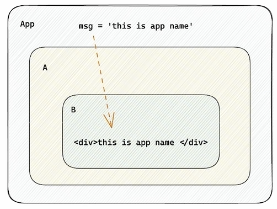
使用Context机制跨层级组件通信:
使用
createContext方法创建一个上下文对象Ctx在顶层组件(App) 中通过
Ctx.Provider组件提供数据在底层组件(B)中通过
useContext钩子函数获取数据
const MsgContenxt = createContext()

function App() {
  const msg = 'this is app msg'
  return (
    <div>
      <MsgContenxt.Provider value={msg}>
        <A />
      </MsgContenxt.Provider>
    </div>
  )
}function A() {
return (
<div>
this is A component
<B />
</div>
)
}function B() {
const msg = useContext(MsgContenxt)
return (
<div>
this is B component
{msg}
</div>
)
}九、React.forwardRef
作用: 使用 ref 暴露 DOM 节点给父组件
import { useRef } from 'react'
import RefExample from './exercise/01Comment/RefExample'

function App() {
  const refExample = useRef(null)
  const showRef = () => {
    console.log(refExample)
  }
  return (
    <div className="App">
      <button onClick={showRef}>showRef</button> // [!code focus]
      <RefExample ref={refExample} /> // [!code focus]
    </div>
  )
}

export default Appimport { forwardRef } from 'react'
const RefExample = forwardRef((props, ref) => {
return <input type="text" ref={ref} />
})
export default RefExample十、useInperativeHandle
作用: 通过 ref 暴露子组件中的方法
import { useRef } from 'react'
import RefExample from './exercise/01Comment/RefExample'

function App() {
  const refExample = useRef(null)
  const showRef = () => {
    console.log(refExample.current)
    refExample.current.handleFocus()
  }
  return (
    <div className="App">
      <button onClick={showRef}>showRef</button>
      <RefExample ref={refExample} />
    </div>
  )
}

export default Appimport { useRef, forwardRef, useInperativeHandle } from 'react'
const RefExample = forwardRef((props, ref) => {
const inputRef = useRef(null)
// 实现组件内部的聚焦逻辑方法
const handleFocus = () => {
inputRef.current.focus()
}
// 暴露函数给父组件调用
useInperativeHandle(ref, () => ({
return handleFocus
})
return <input type="text" ref={inputRef} />
})
export default RefExample